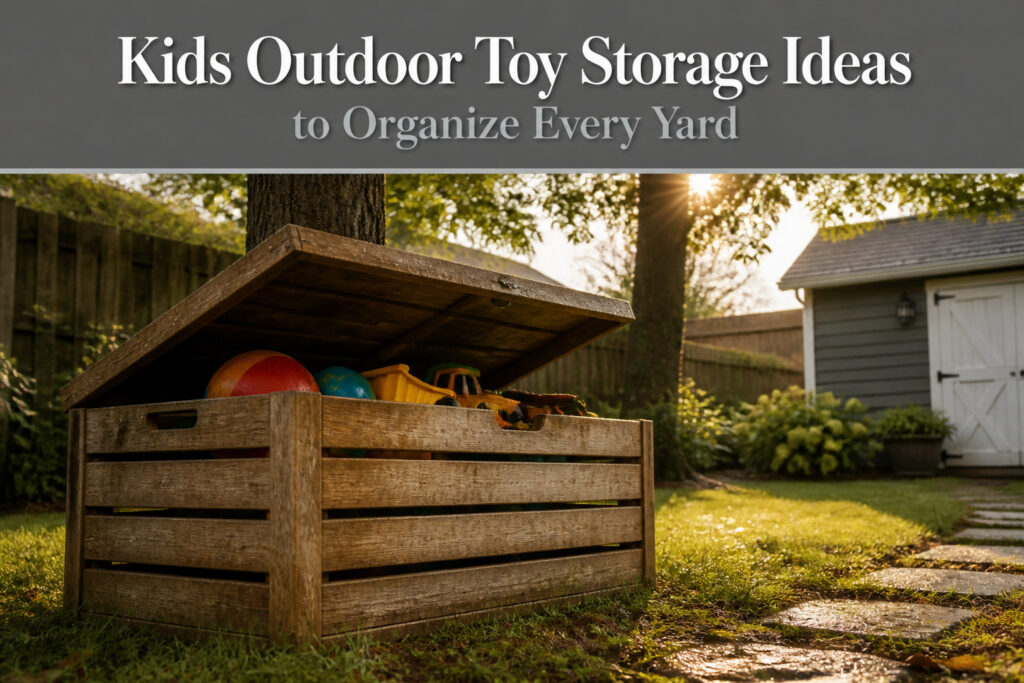
The right storage for your yard depends on whether your kids put toys away wet or dry.
A slatted wood box at $60–$80 beats a sealed resin deck box on airflow every time damp trucks and water guns go back inside, even if it needs resealing every couple of years.
That single condition, wet versus dry, is what separates the ideas that last from the ones that mildew.
1. DIY Outdoor Storage Box
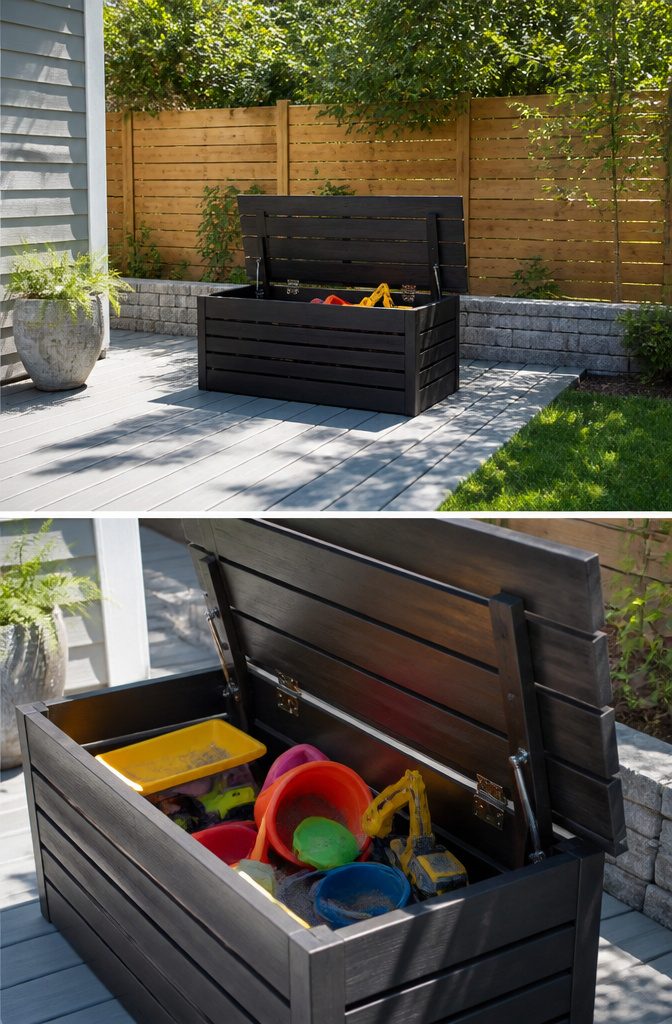
A 4-by-2 foot box built from treated 1x4s and 2×2 legs holds two kids’ worth of trucks and sand tools without swallowing the patio.
The slatted sides and bottom, spaced to let water through, keep wet buckets and water guns from turning musty inside.
A long hinge with hinge supports on either side keeps the lid propped open while small hands dig around, and it closes slowly enough to avoid the finger-trap moment.
The lumber for a box this size runs roughly $60–$80, plus another $15 for exterior-grade screws, stain, and clear coat. Pocket holes at the board ends hide the fasteners and keep the frame square.
One person can cut and assemble it over a Saturday, though setting the lid with its hardware goes smoother with a second pair of hands to hold it flush.
I would stain it with something like Minwax ebony and seal it with an outdoor-rated clear coat; the color darkens enough to hide dirt, and the seal keeps the grain from fuzzing after the first rain.
Resin deck boxes skip the building step entirely and cost roughly the same or a little more, but they do not breathe.
For kids who store toys damp, the slatted wood build wins on airflow, even if it needs resealing every couple of years.

SLATTED, VENTED DESIGN: This outdoor storage has slatted sides and raised base to promote airflow and drainage to help keep contents drier.

[Solid Wood Structure] Thanks to natural wood, renowned for its strength and longevity, the wooden outdoor storage bench provides a large top load capacity of 220 lbs, withstands the rigors of daily use while maintaining its timeless appearance.

[Acacia Wood Frame]: This outdoor storage bench is crafted from natural acacia wood, offering stronger structural performance than spruce wood for daily outdoor use. The teak oil finish adds surface protection and visual appeal. Reinforced hardware connections support up to 355 lbs, allowing the wooden storage box to function as seating.
2. DIY Kid’s Garage
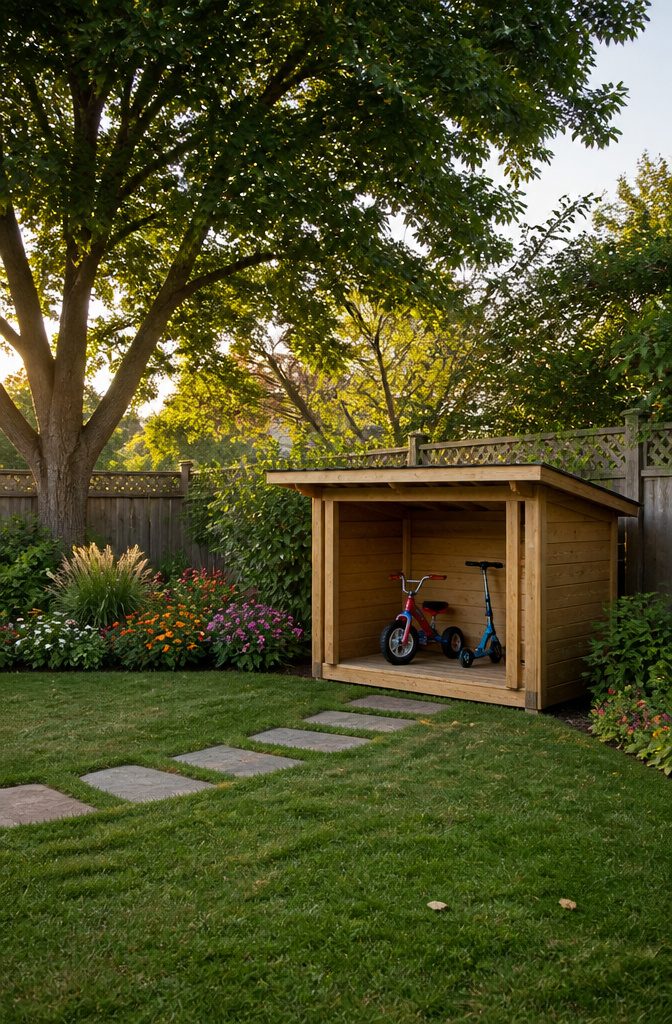
A miniature garage for ride-on toys takes up about the same footprint as a pair of bikes leaned against the house, roughly 6 by 3 feet, but keeps everything upright and out of the mud.
I left the front completely open so my kid could wheel things in and out without help, and I ran the roof about six inches past the front posts so rain would drip clear of the seats.
That overhang has kept the tricycle saddle dry through two winters now, which matters more than I expected since wet vinyl stays cold until midday even in summer.
The mistake I still regret is cutting the side opening to fit the Cozy Coupe we had at the time.
A year later the plasma car became the favorite, and its back wheels catch on those same studs every single time. Plan the opening for the widest thing your kid might bring home, not the one they own today.
I could fix it with a saw in about twenty minutes, but that means taking the roof off, so the plasma car lives at an angle instead.
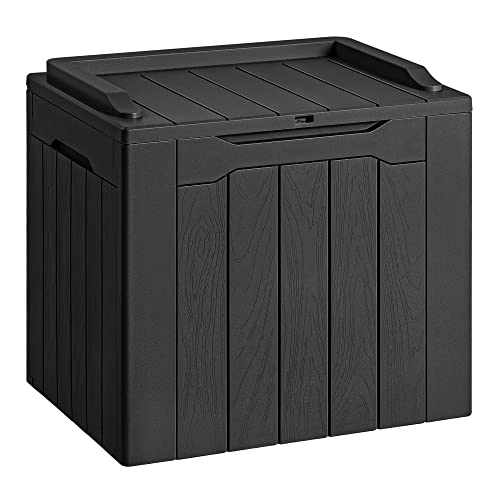
Light & Solid: Made of a high density resin material, it is stable, waterproof and UV resistant. The net weight of this deck box is only 8.8 pounds

Versatile Outdoor Organization:This practical deck box neatly stores patio cushions, garden tools and pool accessories, suitable for balconies, gardens and entryways.

SIT, STASH, AND RELAX IN ONE PIECE. With a reinforced lid that holds up to 200 lbs, this resin outdoor deck storage box works as patio seating or an ottoman, while the interior handles outdoor cushion storage, yard gear, and pool or garden supplies.
3. Large Slat Wall for Toys and Equipment
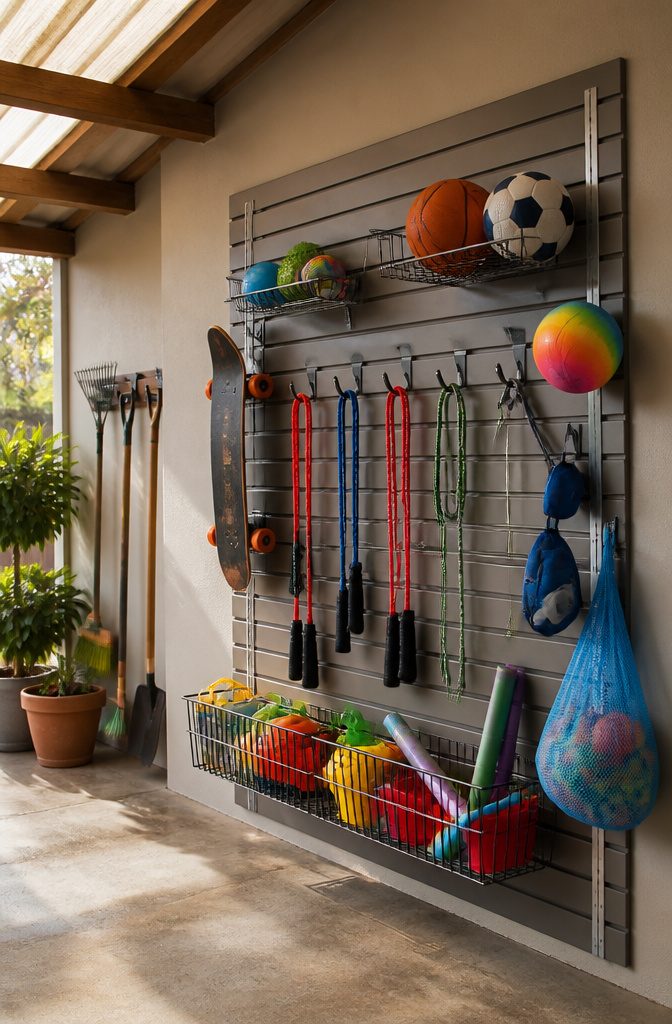
A wall-mounted slatwall system under a covered patio turns dead vertical space into the most flexible storage in the yard.
The aluminum tracks take J-hooks for helmets, loop hooks for jump ropes, and deep basket hooks that cradle basketballs without letting them roll.
Long-handled bubble wands, the ones that never fit into bins, slip straight into narrow tool hooks spaced 8–10 inches apart so the rings don’t tangle.
I tried the PVC slatwall first because the price was lower and it looked identical in the store.
Within two summers of afternoon sun hitting the edge of the patio cover, the grooves had softened enough that hooks pulled free under half the rated weight.
The aluminum system cost more upfront but held its shape; the same hooks that failed in PVC stayed locked even with a loaded bat bag hanging overnight.
Weight limits matter more outdoors than in a garage.
A basketball exerts sudden force when a kid drops it into the basket instead of placing it, so I rate each hook at half its labeled capacity and keep the heavy stuff, bat bags and loaded helmets, on the lowest row where a fall does less damage.
The top rows are for the light, awkward shapes: bubble wands, kite spools, the mesh butterfly nets that collapse if you cram them anywhere else.
The real advantage is reconfiguration without new holes. When the soccer phase replaced the tee-ball phase, the same track held ball claws instead of bat hooks.
No patching, no re-drilling into stucco, just sliding accessories to new slots. That adaptability is what justifies the wall space; a fixed rack would have been obsolete in a season.

KIDS ROLLER COASTER: An amusement park right in your home, long 9-foot roller coaster track, ATV-inspired ride-on car, encourages your child to play actively and independently

LITTLE FARMERS – This Tractor & Cart set is a must-have for little farmers on the go. With the tractor’s realistic features and foot-to-floor design, kids can enjoy imaginative play while developing large motor skills.
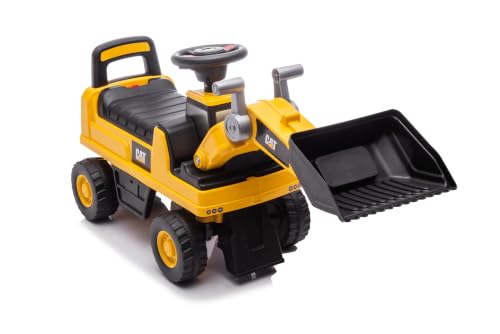
Officially Licensed CAT Excavator Push Car: Authentic CAT design for a realistic and thrilling play experience.
4. Heavy-Duty Storage Bench with Hinged Lid
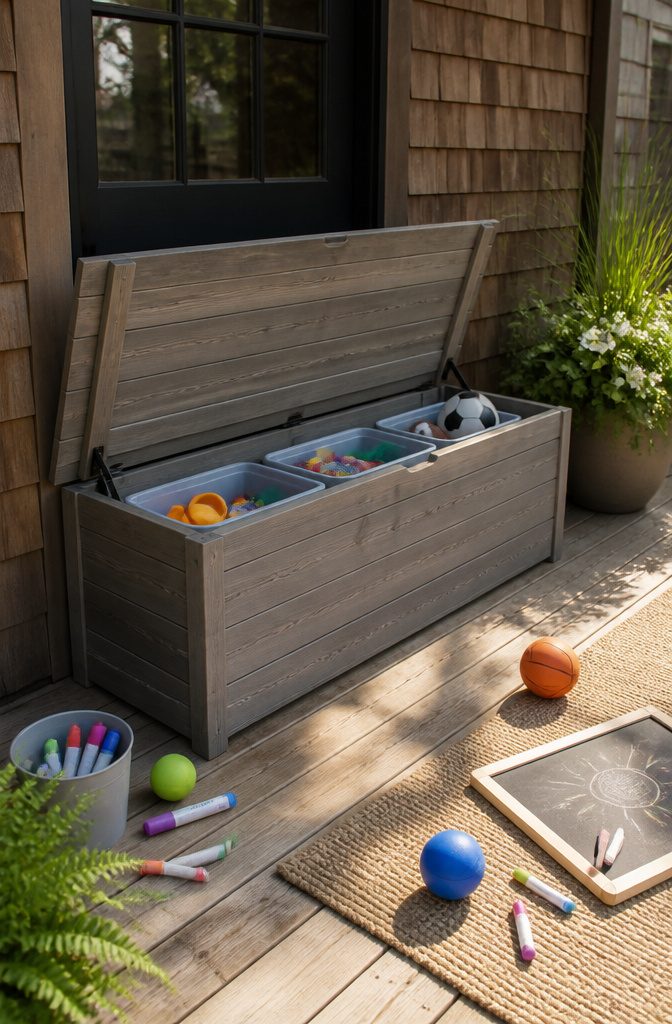
A heavy-duty storage bench with hinged lid turns dead space by the back door into seating and a catchall for balls, chalk, helmets, and the rest of the small outdoor toys that otherwise colonize the patio.
The interior needs to clear about 14 inches front to back and 16 inches deep to hold shoebox-sized bins upright, which keeps categories separate and lets kids lift out one bin without upending the whole pile.
Resin benches run around $80 and look tidy for the first season, but the UV-stabilized plastic gets brittle in freeze-thaw cycles.
The one I tracked in a neighbor’s yard cracked through the lid hinge after its second winter, and the manufacturer had already discontinued the part.
Treated wood starts closer to $140, weathers to a gray that actually suits most yards, and the frame stays rigid enough for the gas struts to do their job.
Those struts are the detail that matters: without them, the lid slams on small fingers; with them, a five-year-old can open the seat and let it descend slowly.
Check that the strut rating matches the lid weight, because an underpowered strut drifts closed, and an overpowered one fights you on the way down.
The wood bench is still going four years in, and the resin one became a lesson in what "weather resistant" actually means on a label.

Comprehensive Package: the storage cabinet package offers you a full organization system for your workspace, including 6 slat wall bins, 12 slatwall hooks and labels; This ensured spaciousness allows you to easily manage and organize various types of items, contributing to an orderly and efficient working environment; Please take care in splitting the product when you receive it

Sufficient Slat Wall Accessories: our slatwall bins set includes 18 items, offering more than enough pieces to cater to your storage needs; Whether you wish to categorize items, declutter your space, share with others, or simply have many things to store, our 18 pieces storage bin set provides the proper choice for you

Value Package: The slatwall accessories kit comes with 4 sizes mesh square slatwall baskets in S, M, L, XL (10.5"x4.5"x3", 11.5"x5.5"x3.75", 12.5"x6.5"x4", 13.5"x7.5"x4.5"). Each basket supports up to 30 lbs, perfect for organizing everything from small screws to bulky tools
5. DIY Nerf Gun Storage Rack
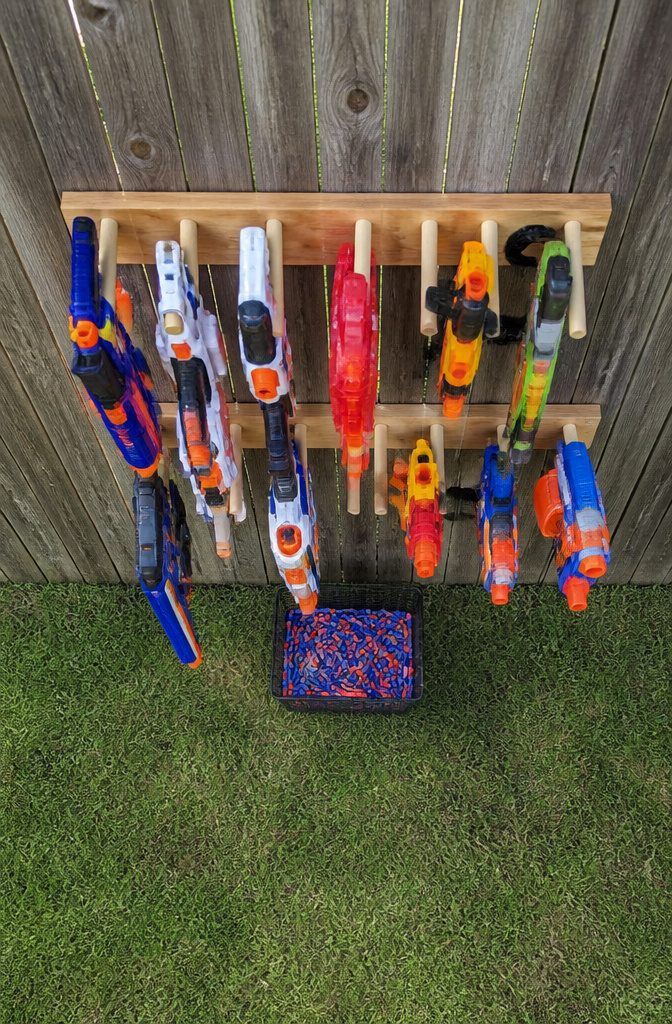
A fence-mounted rack keeps blasters upright and off the ground where they turn into tripping hazards.
I built the wooden version with ⅜-inch dowels spaced 4½ inches apart for standard Nerf blasters; wider guns like the Mastodon need 6-inch gaps or they jam between the pegs.
The lower shelf holds magazines and the smaller pistols that slide off dowels anyway.
The PVC pipe version ran me $12 in parts at the hardware store: two ten-foot lengths of ¾-inch pipe, a handful of elbows, and a few T-joints.
It assembles faster than wood and handles rain without swelling, though it looks more utility shed than backyard.
Foam darts were the surprise problem.
I added a mesh basket underneath for ammunition, but the darts still scattered every time the kids grabbed a blaster. A lidded bin, roughly shoebox-sized, now sits on that lower shelf with a 2-inch hole cut in the top.
They drop darts in through the slot, and the lid stays on until reloading day. Without that restriction, the darts migrate to every corner of the yard inside a week.

🏀Versatile Elastic Strap Design : This basketball holder features a unique elastic strap system, perfect for holding basketballs, soccer balls, footballs, yoga mats, and yoga balls. The flexible design maximizes storage capacity and makes it easy to grab items from any position. You can choose to install the elastic strap locks at the top or bottom of the rack, giving you complete customization.

Dimension: Medium-10.8'‘L x 3.5"W x 7.9H(folded); Large-12.6'‘L x 4.5"W x 9H(folded); 4 separate compartments with zip and back open pocket for great organization. Suitable for your family trip to pack all men, women , and kids toiletries

1. Zipper CLOSURE DESIGN:The zipper closure at the top which helps with accidental spills and keeps spiders or bugs out after close, better protect the items inside
6. Organized Cabinet for Toy Categories
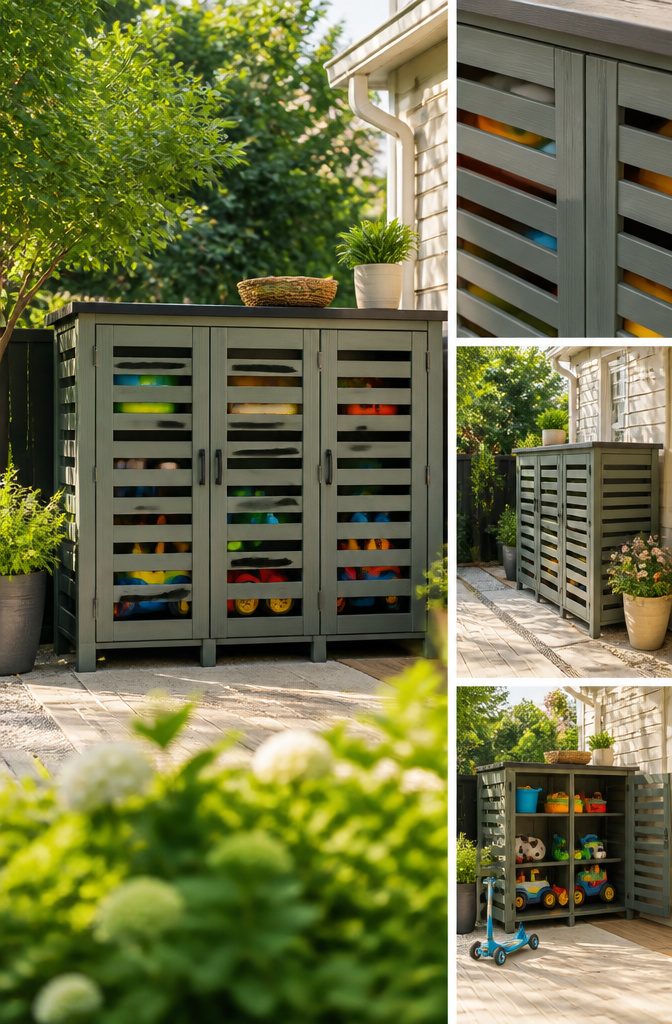
A weather-resistant cabinet with designated shelves or bins for each toy type finally ended the daily argument about where things belonged. The system that stuck sorted into four zones: water toys, sports gear, sand tools, and ride-ons.
Water toys and sand tools need open shelving or slatted bottoms so debris and drops strain through; sports gear stacks fine in solid bins; ride-ons take the floor space beneath the lowest shelf.
Labels were the weak point. Standard adhesive labels faded to illegibility within two summers of sun and humidity.
The replacement that held up was engraved tags, either metal tags wired to bin handles or routed directly into wooden shelf fronts. No ink to bleach out, no peeling corners.
Material choice matters less than ventilation. Resin cabinets hold up but trap moisture; wood breathes better if you keep it off direct ground contact.
Either way, cut vent slots low on the sides or leave a deliberate gap between the cabinet back and your wall or fence. Without airflow, the cabinet becomes a mildew box by August, and no category system fixes that smell.

Ideal Home Decor: Our toy box combines rustic brown aesthetics with a retro design, making it not just functional but also a decorative addition to your home

Solid Acacia Wood Build: Crafted from natural acacia hardwood, this deck box brings the strength and rich grain of solid timber to your outdoor space. A teak oil finish enhances the wood's natural character while giving the surface a smooth, lustrous sheen. All panels are fastened with premium hardware, and the frame holds up to 355 pounds, so you can load it with cushions and tools or sit on the lid without worry

Durable Solid Wood Frame: Made of natural acacia wood, our storage bench is sturdy and durable without easy deformation or cracking than those made of fir wood. The teak oil coating provides a beautiful and lustrous finish in addition to a layer of protection. All parts are connected by premium hardware, ensuring a high load bearing capacity of 355lbs.
7. Clear Bins with Labels
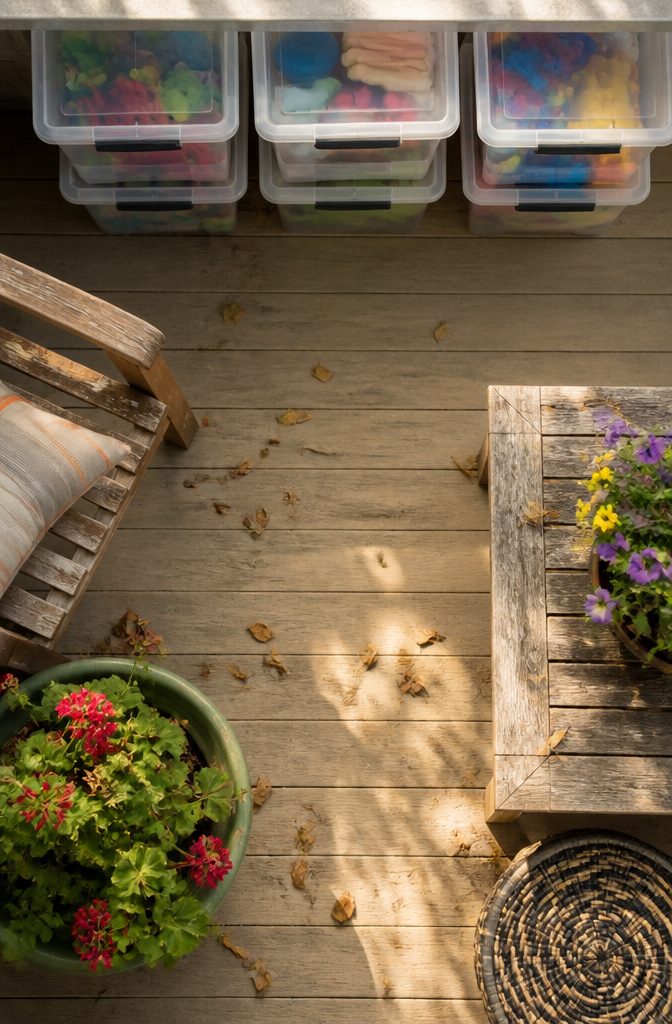
Transparent bins earn their keep outside only if the plastic itself holds up.
I learned that the hard way with two sets from the same aisle: the $4 bins turned milky after one summer under a covered patio, while the $8 ones stayed clear through the same season.
The difference is UV stabilizers in the resin, and for outdoor use that four-dollar savings costs you the one feature that makes the system work.
Stackable 18-gallon and 30-gallon sizes fit standard wire shelving without hanging over the front lip. Labels go on the short side, not the lid, because lids get swapped and the short face is what kids see from ground level.
I use a label maker with vinyl tape; paper labels dissolve in humidity even under cover. Each of my kids gets a color, blue for one and green for the other, so "put it in your bin" actually gets followed.
The color coding matters more than the label text for anyone under six, but the words keep me honest when I’m the one cleaning up.

LARGE OUTDOOR STORAGE BOX: Fashionably store your outdoor furniture cushions, pool floats, and more. This outdoor storage bench offers lots of convenient, lockable storage space and has enough room to seat 2 adults.

DIMENSIONS: Exterior: 50.4 in. W x 21.2 in. D x 23.2 in. H / Interior: 49.6 in. W x 20 in. D x 22.8 in. H

Maximize Your Outdoor Space with This Versatile Deck Box:This outdoor storage box is the ultimate solution for decluttering and organizing. Perfect as a stylish deck box for patio cushions, garden tools, or pool accessories, it also functions seamlessly as one of the most reliable package delivery boxes for outside. Its adaptable design brings order to balconies, gardens, garages, and entryways.
8. Creative Storage for Tennis and Pickleball
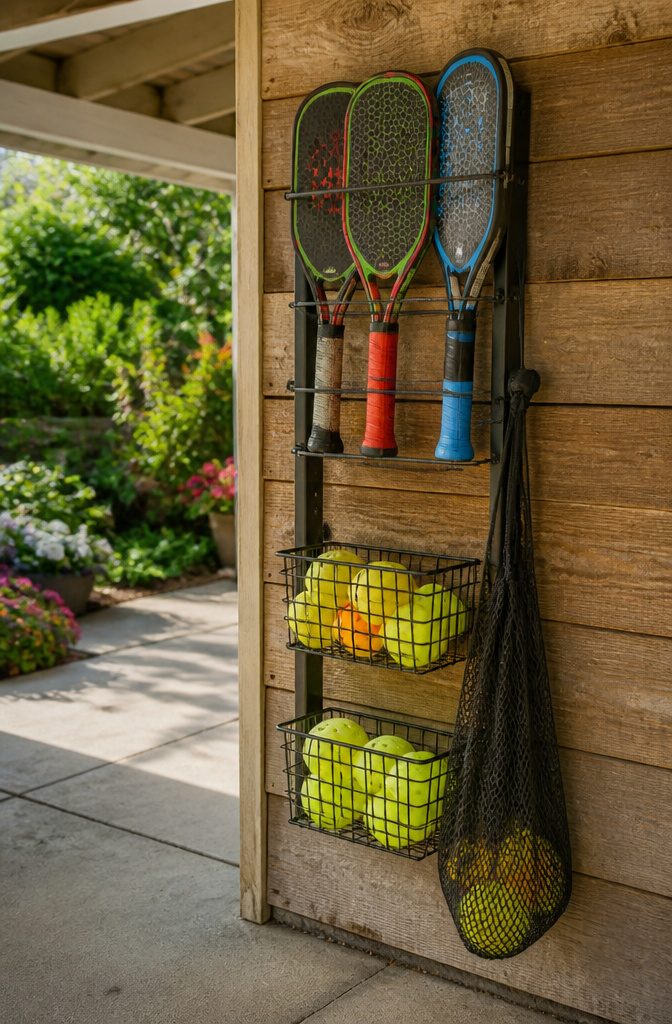
Rackets left horizontal on a garage shelf warp faster than you’d think, especially when summer heat builds under a metal roof.
A vertical wall system keeps the head shape intact and gets the gear off the floor where it becomes a tripping hazard between the car and the recycling bins.
I mounted a tensioned bungee setup against the studs in our carport last spring.
The cords cradle the throat of each racket without compressing the grip, which is the mistake most generic hooks make; they squeeze the cushioning flat and the tape starts slipping by August.
The bungee lets the frame hang freely, weight supported at the balance point rather than the handle end.
Ball hoppers stack neatly underneath, but the portable net bag needed its own dedicated hook or it immediately became floor clutter.
I tried draping it over the hopper handle for two weeks. It slid off every time the kids bumped it running past, and the mesh collected leaves and driveway grit.
A single screw-in hook at eye level solved it; the bag stays open enough to dry if the net went back in damp, and it no longer migrates.
Sun damage to racket heads is real. Our first set of composite frames faded and crazed where the afternoon light hit them through the carport’s open side.
The wall system lives on the north-facing wall now, or I hang an old towel as a curtain during July and August.

Sounds are mechanical, so no batteries are needed

UNICORN THEMED RIDE-ON SCOOT FOR TODDLERS – Kids will love riding their unicorn over the rainbow.

REALISTIC CONSTRUCTION TRUCK DESIGN: Frontloader ride-on toy. Perfect for little builders ages 18 – 36 months, this fun ride is ready for action on the sidewalk or driveway, supporting up to 44 lbs.
9. Low Storage Bins for Kids’ Access
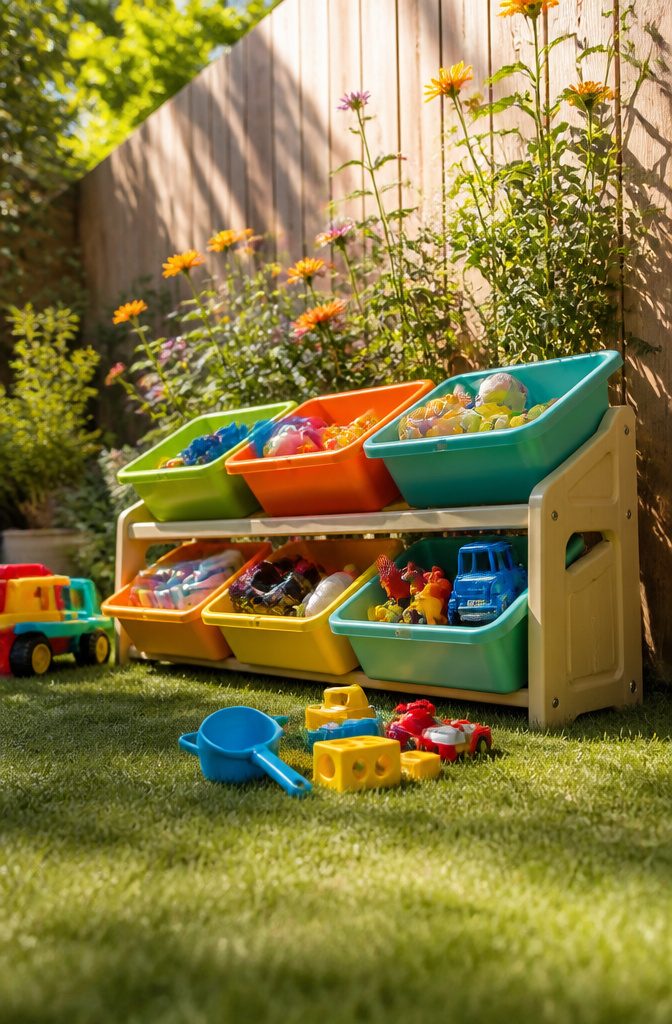
Open bins sitting at 24 to 30 inches let a preschooler grab what they need without calling for help.
That height range clears most three-year-olds while keeping the contents visible from above, which matters more than it sounds: a bin too deep turns into a pit where toys sink and disappear, exactly the problem that kills indoor toy boxes.
Depth should match what goes inside. Shallow trays work for chalk, bubbles, and small figures; deeper bins hold balls, trucks, and the odd watering can.
The Trofast system runs four bin sizes for exactly this reason, though any frame-built setup can do the same with standard tubs.
Pull-out bins tip. A lip on the front edge or a simple track underneath fixes it; without that, the whole unit tilts toward the child every time they yank.
I have watched a full bin of wooden blocks dump across a patio because the builder skipped this.
The bottom row is where out-of-season toys live. Sand tools in November, sled parts in July: rotate them up when the weather turns and the novelty comes back.
A weekend build needs only a 2×4 frame sized to whatever bins you already own. Screw it together, level it on pavers or deck blocks, and slot the bins in.
No roof, no hinges, nothing to trap moisture; the whole thing costs an afternoon and lumber you can carry in one trip from the hardware store.

Multi-scenario Applications: Our slatwall bins are specifically designed to be simple and versatile. They are used commonly in workshops,garages,retail stores,stores,home and other scenarios to hold screwdrivers,films,vise, scissors,wrenches,nuts, bolts,drills, brushes,kitchen spices,snacks,toiletries,skin care products and various other accessories.

EASY FRONT ZIPPER ACCESS - Let you grab items from the bottom without emptying the bin. Perfect for quickly reaching specific balls, gloves, rags, and toys stored at the base. Breathable mesh dries wet gear fast and keeps items visible.

MAKE FULL USE OF YOUR SPACE: Unleash the true potential of your garage wall organizer for tools with the garage slat wall panel. By making smart use of vertical wall space, you can revolutionize your garage into a seamlessly organized and efficient area. Bid farewell to a messy garage and welcome a meticulously optimized space that maximizes every inch available. Enjoy effortless access to your tools, equipment, and accessories, all while crafting a visually captivating environment.
10. Wall Hooks for Awkwardly Shaped Items
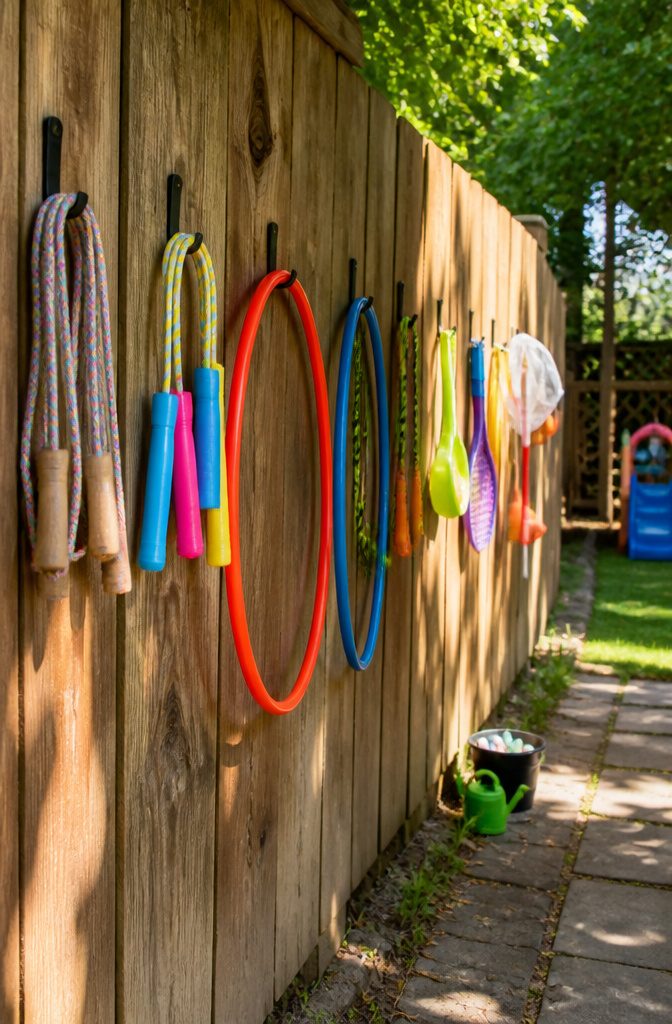
Some outdoor toys simply refuse to sit flat.
Jump ropes coil into knots, hula hoops roll underfoot, and kite spools tangle with anything nearby. Individual wall hooks solve what bins cannot, but the type matters more than I expected.
J-hooks handle most of this load. A basic 2-inch J-hook screwed into fence slats or siding holds a single hula hoop or coiled rope without letting it slip sideways.
Peg hooks work better for kite spools and smaller items with a hanging loop, since the narrower profile keeps the spool from swinging into its neighbor.
For heavier oddities, bicycle hooks, the kind shaped like a shepherd’s crook, cradle bulkier shapes without stressing the mounting point.
Spacing is the detail that prevents morning chaos. Leave at least six inches between hooks for anything that spins or coils, or you will untangle jump ropes before the kids can use them.
I learned this after cramming hooks too close and watching the whole row become one knot by Wednesday.
Fence-mounted hooks suit renters better.
A fence panel takes screw holes without fuss, and the repair is a matching board if you move. House walls demand more commitment, and the siding or sheathing behind vinyl needs finding first.
Adhesive hooks failed me completely.
I tried them on painted siding one spring, and the first humid morning sent a row of jump ropes into the flower bed. Screw-mounted hardware costs more in time, but it stays where you put it.

The MESH TITAN is the original and only hanging outdoor pool float organizer that can efficiently hold more pool inflatables than a 150 GALLON covered deck box

【Large Capacity & Adjustable Design】: This stuffed animal storage organizer features an adjustable height from 42 to 72 inches, allowing it to hold a generous amount of plush toys, teddy bears, and stuffed animals. Perfect for growing kids, it expands to fit more items while keeping your child's room tidy and spacious – ideal for nursery organization or playroom storage solutions.

Sturdy & Large Capacity - These 3 Tier Hanging Storage Basket are made of sturdy mesh fabric with strong hook can hold many objects. Strong enough for long term use. waterproof and easy to clean. Easy to put in and take out and easy to see what's inside through the net.
11. Large Stackable Baskets
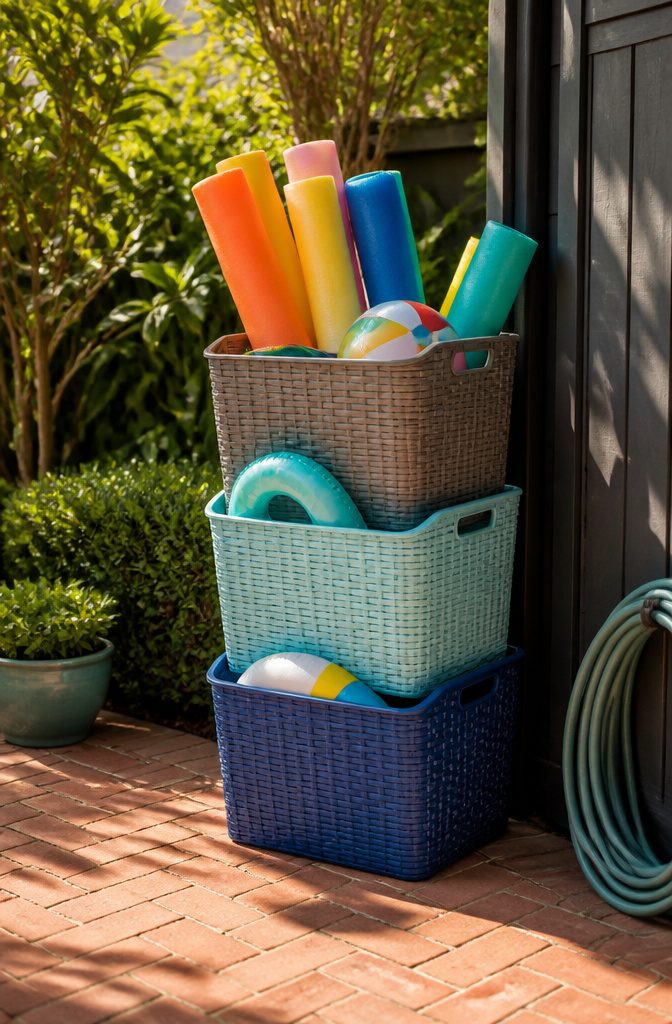
Open wire baskets look tidy until the second season, when the coating starts flaking and the bottom rungs rust through from sprinkler overspray and wet pool toys.
I swapped mine for coated resin after that happened, and the resin set has held up without the orange bloom.
The resin baskets I use now measure roughly 22 inches long, which fits a standard pool noodle straight across without bending or jamming it in at an angle.
Handles sit on the short ends, so a kid can carry the basket two-handed without the load swinging into their knees.
Stacking works if the handles fold down flat; otherwise the top basket tilts and slides the moment a child pulls from the bottom one.
I keep the stack to three high on the patio, two if the bottom basket holds anything heavier than foam or inflatables.
The open weave matters more than I expected.
Water drains straight through after rain or the hose, and the toys dry by afternoon instead of sitting in a puddle that turns into mildew. Solid bins trap that moisture; mesh or open slats skip the whole problem.
12. Covered Kiddie Parking Garage
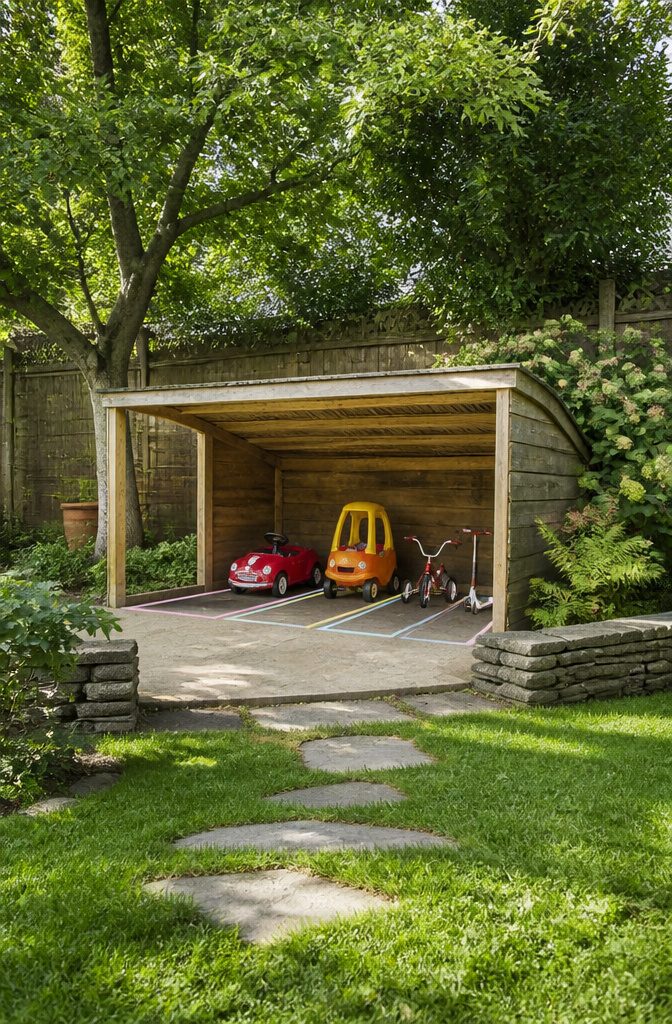
A roofed structure for ride-on cars keeps the seats dry and the wheels out of mud, which matters more than I expected once my nephew started leaving his trike in the sprinkler line.
Plywood sheeting over a simple frame runs about $60 in materials if you already own a saw and a drill, while store-bought versions with plastic roofs start near $120 and climb fast for anything that fits more than two vehicles.
The real improvement comes from marking parking spots.
Chalk lines or colored tape on the floor give kids a visual lane to back into, and the difference in how straight they park is immediate. I would leave six inches between spots so handlebars do not tangle.
Drainage is the part easy to skip and regret. A shallow channel cut across the front edge, sloped slightly toward one corner, stops puddles from pooling where small feet step in.
Without it, you are dumping water out of toy cars after every rain. Store units rarely include this; the plywood build lets you plane the groove exactly where you need it.
13. Garage Pegboard for Toys
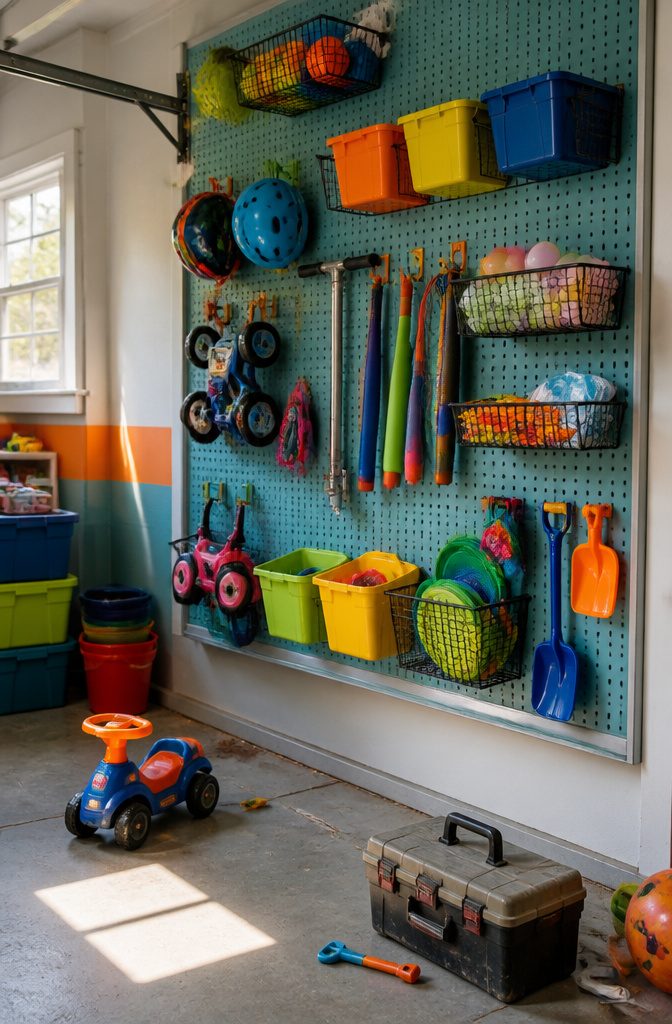
A painted pegboard system mounted in the garage or under a covered patio gives outdoor toys the same flexible storage mechanics you’d use for hand tools.
The board itself needs sealing on all faces, not just the front, or humidity from wet tricycles and morning dew will warp the fiberboard within a season.
I learned that after installing an unsealed panel that bowed outward enough to drop a sand bucket hook.
The frame matters as much as the board.
A 1×3 border screwed through the pegboard into studs on all four edges keeps the surface flat when kids yank hard on the hooks. Without that tension, the holes oval out and pegs loosen.
Hook choice determines what actually stays put. Straight metal pegs work for ride-on cars with molded undersides; double-prong hooks grab plastic shovels and bubble wands; small bins on pegboard brackets corral sidewalk chalk and water balloons.
I color-coded each zone with painted borders, blue for wheeled toys and green for digging gear, and a four-year-old who visited could return items to the right section without reading a label.
The visual cue stuck faster than word labels ever did.
What Weather Resistance Actually Means
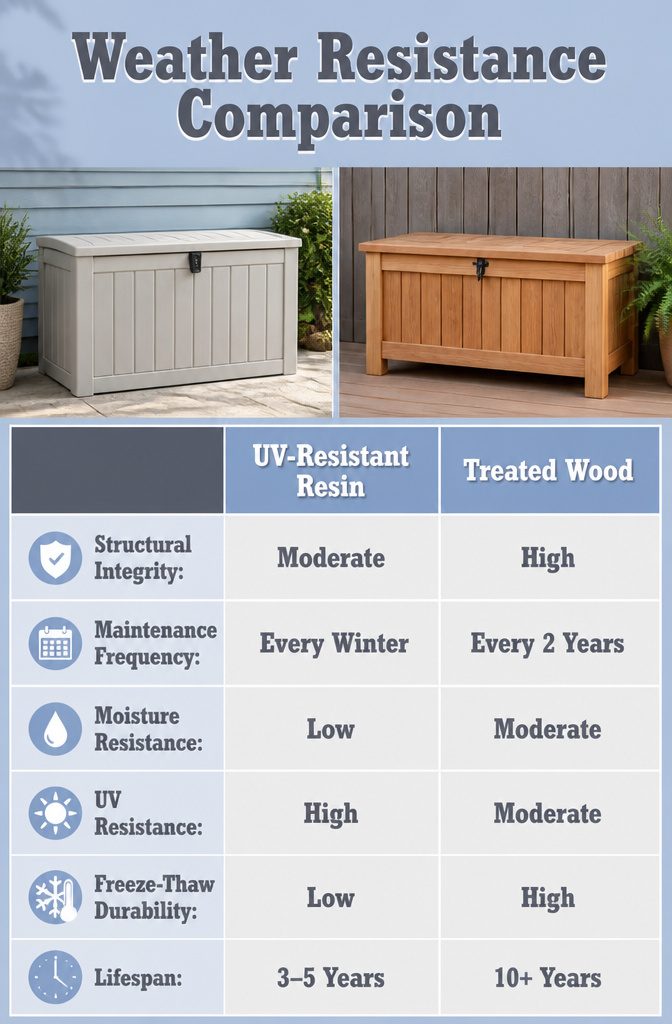
UV-resistant resin, treated wood, and heavy-duty plastic each handle weather differently, and the label "weather-resistant" sells more confidence than it should.
Resin benches look solid until freeze-thaw cycles hit; the material expands and contracts through temperature swings, and by the second winter the hairline cracks are wide enough to let water into the hollow core.
I learned that one after leaving a storage bench on a concrete patio in Ohio, where a single March week bounced between 60 degrees and a hard freeze. The bench was trash by April.
Cedar holds up better structurally, but only if you reseal it every two years. Skip that maintenance and the grain opens enough to hold moisture, which warps boards and eventually rots them from the inside.
Treated lumber buys you more time, though the chemical treatment fades at cut ends and hardware holes, which is where water finds its way in first.
For wet toys, mesh bins drain and dry; solid plastic traps mildew against anything left damp. I keep the mesh ones under the covered porch for pool noodles and sand buckets, and they stay usable all season.
Solid plastic only works if you are diligent about drying everything before it goes in, which, with kids, is a fantasy.
Drainage and Airflow for Wet Toys
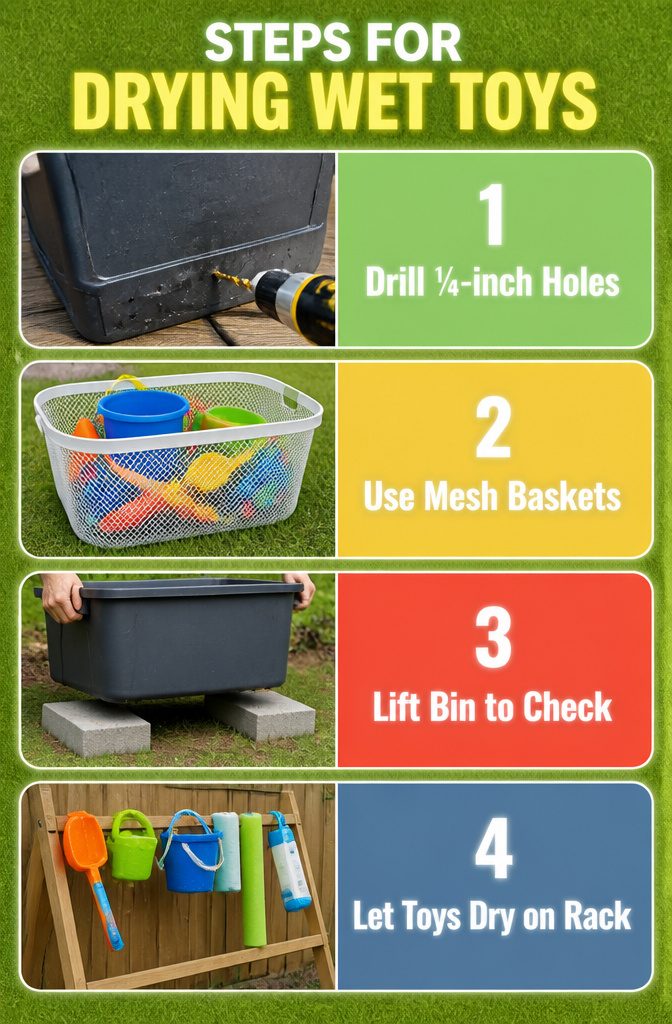
Standing water in a solid bin turns into a science experiment within a week.
The sour smell that once sent me bleaching every plastic tote in the yard came from exactly that: toys put away wet, lid snapped shut, forgotten until the weekend.
Now the rule is drill ¼-inch holes in the bottom of any bin that will hold water toys, or skip solid sides entirely.
Mesh laundry baskets solve the problem without tools. Water drains through the weave, air moves across the toys, and when the basket itself gets grimy you rinse it and set it back out.
For anything I keep in a solid bin, I set it on two concrete pavers so the bottom stays off the damp ground and the holes can actually do their job.
The drying rack I built from leftover deck balusters sits against the fence.
Toys hang across the slats or lean between them, and by morning they are dry enough to bin. The weekly check is simple: lift the bin, look for pooling, smell for the first hint of mildew.
Catching it early means a rinse with the hose. Waiting means bleach, scrubbing, and wondering why the kids stopped putting toys away.
Keeping Storage at Kid Height
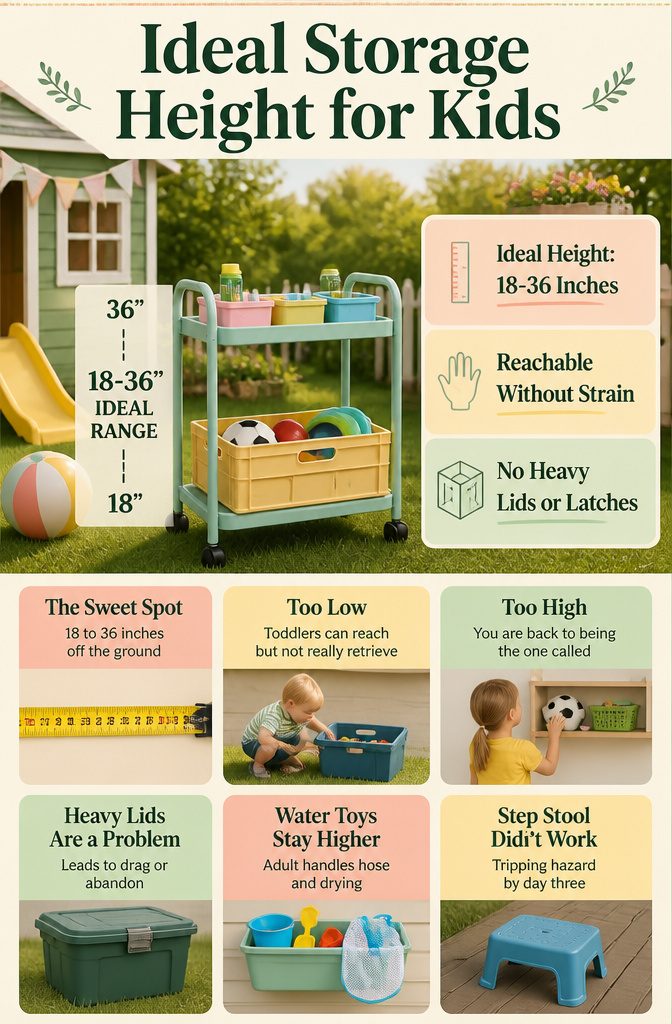
The sweet spot for independent kid access sits between 18 and 36 inches off the ground. Below that range, toddlers can reach but not really retrieve; above it, you are back to being the one called every time a ball goes missing.
I learned this the hard way with a rolling cart that felt perfect to me. The top shelf held chalk and bubbles in small plastic containers, easy to see and grab.
The bottom held the bigger stuff. But the lid on one of those lower bins was heavier than it looked, and the latch needed two hands and a pinch.
My kid would drag the whole bin out instead of opening it, or give up and leave it in the grass. Cleanup participation dropped to zero until I swapped in a lightweight crate with no lid at all.
Water toys are the exception that proves the rule. Sand buckets, shovels, and the mesh laundry bags that strain out the grit still live in a planter mounted higher up, because an adult manages the hose and the drying anyway.
I tried a step stool for a week so the kids could reach it themselves. It became a tripping hazard by day three, and I moved it to the garage.
Toy Rotation to Cut Clutter
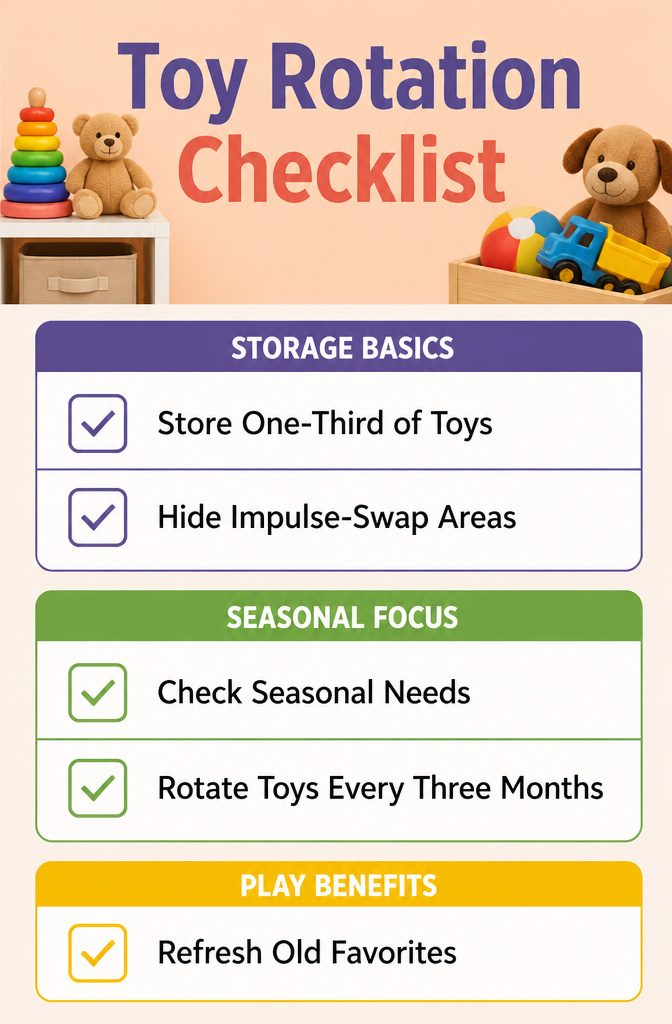
One-third of the toys stay out; the rest go up to the garage rafters or a closet shelf.
That is the rotation that actually held. I tried weekly swaps first, and the schedule exhausted everyone, me most of all.
By the time I hauled bins down, sorted what was dirty, and convinced a six-year-old that the sandbox set had to go back in, the weekend was gone.
Seasonal rotation works because it lines up with weather, not willpower. Water toys come down when school starts; the balance bike reappears when the driveway dries out.
The storage spot matters less than making it inconvenient enough that you do not impulse-swap. A closet shelf behind the winter coats is about right.
The part I did not expect: toys left alone for three months come back feeling new.
Not new like a gift, but new enough that the kid actually plays instead of stepping over them. No purchase required.
Repurposed Furniture as Storage
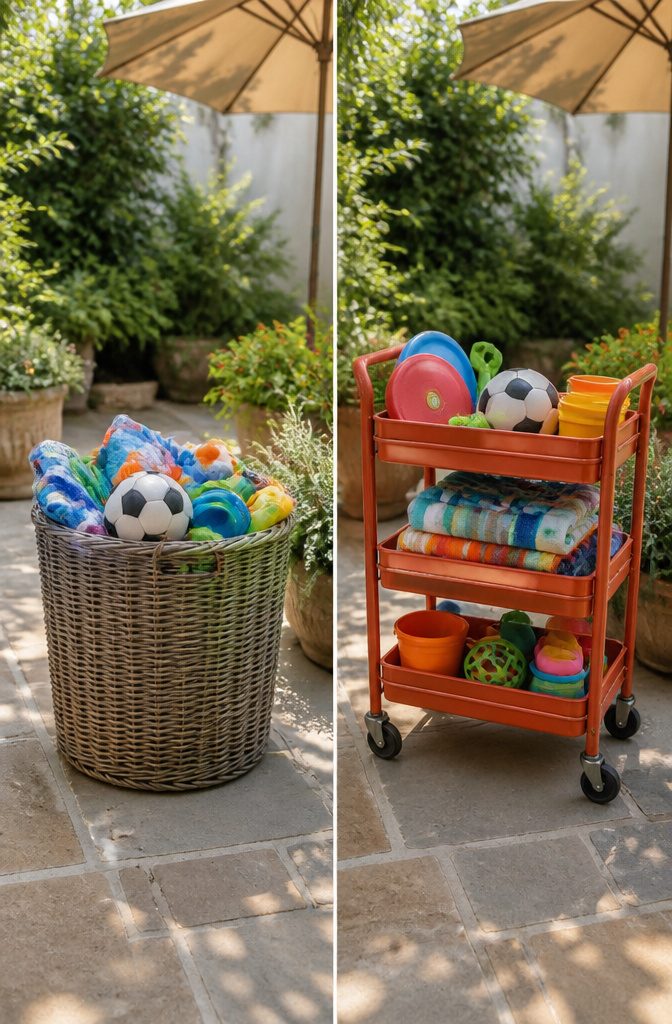
A metal library cart with four casters will roll across patio joints that stop most plastic bins cold.
I found one at a yard sale for $15, added a can of rust-inhibiting spray paint, and it outlasted a $90 purpose-built cart I bought the following spring.
The difference was the sealant. I hit every joint and weld with a marine-grade clear coat after the color coat dried; without it, the first rust spot shows up in six weeks.
Bar carts work the same way, though their thinner frames need a cover between storms. A fitted grill cover, cinched at the bottom, buys two or three extra years before the finish goes.
Wood dressers are the gamble.
I tried a mid-century chest that looked perfect on the porch until August humidity swelled the drawer boxes and jammed them completely. Solid wood swells; particleboard warps and stays warped.
The dresser that survived was teak, sanded to bare wood and finished with three coats of spar urethane, including the underside of every drawer. Even then, it lives under a tarp from November through March.
Frequently Asked Questions
How often should outdoor toys be cleaned?
Give frequently used toys a quick rinse weekly to clear off dirt, sand, and grime. A weekly check also lets you spot pooling water or the first hint of mildew before it turns into a bigger job.
Catching it early means a rinse with the hose; waiting means bleach, scrubbing, and wondering why the kids stopped putting toys away.
What materials are best for outdoor toy storage containers?
UV-resistant resin, heavy-duty plastic, treated wood, and rust-resistant hardware hold up to sun, rain, and temperature swings.
Mesh works best for wet toys since it drains and dries quickly, while solid bins trap moisture and turn into mildew boxes by August if you are not diligent about drying everything first.
Cedar holds up structurally but needs resealing every two years; treated lumber buys more time though water still finds its way in at cut ends and hardware holes.
Can outdoor toy storage improve backyard safety?
Yes.
Keeping toys stored clears tripping hazards from walkways, steps, and play areas, which lowers the risk of falls. It also keeps toys off the lawn where they can hide sharp objects or damage mowing equipment.
A fence-mounted Nerf rack gets blasters off the ground, and a low storage bin at 24 to 30 inches keeps preschoolers from tipping units that pull toward them.